Thursday, March 31, 2011

The East and West Walls

Ok, this portion of the build was very fluid.  I had no idea what to do until I did it.  In the end I decided to put a full sized door on each end, and a window in each door.  I build the walls in place, rather than building them on the floor and tipping them up.  There was a lot of cutting to fit.

I used a header above the door, 2x4 this time, there won't be a whole lot of load to support. 
Door opening in the east wall.
More studs in the East wall.  The west wall will be identical.  I have a single rafter up as a guide.

Wednesday, March 30, 2011

BEES!

My wife's beehives arrived.  How exiting!  They have nothing to do with the chicken coop.

The wife nailing together deep hive bodies.

The various brickabrack that make up an apiary (bee hive to the layperson)

The South Wall

The South wall is going to be a wall with as many windows as possible.  I started  by laying out the windows and getting a feel for where things would line up.  It turns out 5 of my windows fits about as snugly as I could hope for.  Because the windows are greater than 16" wide, I'll have to use a header.  I used two 2x6 with a strip of 1/2 plywood in between them.  I then doubled up the studs between each window.  A professional would probably have an issue with how this was executed, but I think it will work fine.

After adding the doubled studs, I added a horizontal lower and upper plate for fastening the window frame to.  I then added short studs in the portions of the wall not occupied by windows to maintain my 16" on center studs to fasten the plywood siding to.  

South wall with the header.
2x6 header with West end king and jack stud (the king has a screw in it).  It looks like there is plywood between the king and jack studs, but its just some defects in the 2x4 studs.
I made a spacer block to set the stud spacing exactly to fit the windows.
Showing more or less how the window will sit in the opening.


The South wall, stood up, with some of the short joists added in.  I'll do the same thing to the top.

The North Wall

I build the North wall 5' tall, no windows.  Pretty straight forward.  I built it on the floor and then tipped it into place.  Then I screwed the bottom plate to the floor/joists below with 3" screws.  Standard 16" on center construction.

The North wall with the studs located where the sheets of siding will overlap.  I want those to be accurately spaced.

The completed wall tipped up and screwed down.

Friday, March 25, 2011

The Windows

Its not time for the windows yet, but I took a trip back to our top secret repository of junk, aka the "good junkyard" and grabbed some windows we saved from when my brother re-windowed his cabin.  I haven't devised a plan yet, but I'm thinking I'll get 6 windows on the South wall (the tall wall) and a window each on the East and West ends. 
Its hard to get anything down without a 120 hp diesel.
Windows in frames with screens.  I think I will have to pull the windows of the frames.  They started life in 1989 as barn windows from Menards.

Adding the Floor.

Of course this coop will be over dirt, so I want all surfaces exposed to earth to be green treated.  I added (3) 3/4" sheets of treated plywood to the joists with stainless screws.  Nothing fancy, but I did take care when laying out the joist to make sure the plywood fit perfectly on an 8'x12' joist layout.  Even with all my care, when the plywood is laid edge to edge is actually 12-3/16", but I figured I could live with being off 3/16".

Making sure the first sheet is absolutely square and lined up.  It will determine the position of the rest of the sheets.

All the sheets on the joists with screws on the edges.  I'll go back and get the screws in the middle later.   

I used a straight 2x4 as a guide for laying out the screws.

Monday, March 21, 2011

Blocking the Lagging the Joists.

I will be using my coop as one leg of the chicken run fence, and I don't want any critters getting into or out of the fence by sneaking over the skids.  I added 2x4 blocks between each joist.  These block aren't really structural, so I didn't put a lot of time into perfect spacing or screwing them down to the skids as well as the joists.

After blocking I added a 3/8x8 lag in each end of the first and last two joists.  These four joists will be keeping the skids parallel when moving the coop, and I need them anchored well.  I chiseled out a little pocket on the joist so the head of the lag would sit below the joist.  This will keep the plywood sitting flat on the joists.
Adding the blocks between the joists.
In the bottom half of the picture you can see the lags holding the first two joists to the skid. 

Addind the First Floor Joists

With the skids firmly lagged together I added the first of the floor joists.  I am making the deck exactly 8' x 12', mainly because I don't want to cut any sheet stock I don't have to.  With this size I can use 3 4x8 sheets of pressure treated plywood. (I will be covering the pressure treated wood with untreated so the poultry cannot pick at it.)

I started with the first and last joist, and added the joist that would support the edges of two sheets of plywood.  This was to ensure the joists were accurately spaced at the seams.  After that I added the rest in between.  I screwed each joist to the skids with 2 screws into each skid.  I also screwed the crossmembers to the joists as well.

For all pressure treated wood, corrosion resistant fastener must be used. I used 2-1/2" stainless steel screws for all the joists.  At $14/lb, they were pretty spendy, but I want the coop to last a looong time.

The first joists and endcaps.  Once I verified my 3 sheets of plywood would fit, I added the remaining joists at 16" on center.
 

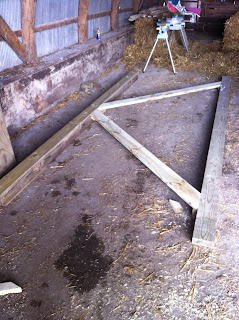
Tying the Skids Together


If I didn't tie the skids together with angled bracing, they would tend to rack out of alignment when we tried to move the coop.  By using two members at opposing angles, I can keep the skids in place relative to each other.  Is it is now, the skid on the left could pivot around the two board easily, but I'll remedy that when I add the floor joists.  The skids were spaced so they were 6' from outside edge to outside edge.  That will give me a 1' overhand on each side and keep the unsupported span of the floor joists to a minimum. 

Originally I used a single 3/8x5" galvanized lag screw in each of of the 2x6 crossmembers, but I upped that to a 3/8x8" lag.  I was afraid the 5" lags just didn't have the holding capacity.

Skids with 2x6 crossmembers.


Later I decided to replace the shorter lag screws on each ends of the crossmembers.

Getting the Skids Ready

So, I've decided to build a chicken coop.

I don't have any solid plans, but it will be build on skids (to move it when we get tired of chickens), be 8x12 (to maximize the use of standard building materials), and be a mono-sloped roof.  The south wall will be 8' tall, and the north wall 6'.  I have a bunch of old barn windows from our cabin I will be using... somehow... on the south and east walls.  The west wall with have a door and probably a window.

The first thing I did was put a 45 degree break on either end of the 6x6 skids.  I augured a 1" hole in each end of the skids as well.  I thought it might come in handy someday.  I also decided to use 14' skids and let them stick out 12" on each end of the coop.  If we ever have to move the coop, we can get the loader bucket under the skids a little easier.
6x6 skid with a 45 degree cut and 1" hole.